
Writing a 6502 Emulator, part 2
Published:
Last week, I set up the beginnings of a 6502 emulator, including the core codebase. Unfortunately, a command line application that just runs 6502 assembly code is super hard to debug. The 6502 isn’t equipped with any way to print output by default (unless you’d hook up a 65C22 VIA, but coding that seems tricky), and reading raw bytecode isn’t the easiest thing to do. Other emulators I’ve used (ex. Symon) include a pretty nice GUI to debug applications. I didn’t want to go as far as writing a whole application frontend, but I did think implementing some kind of updated UI would be a great addition for both users and for my personal debugging.
Curses!
Most programmers have probably heard of the Curses library, but if you haven’t, let me be the first to say: it’s an awesome package of code. Curses (a pun on “cursor optimization”) allows people to easily design terminal-based GUIs that are cross-compatible with almost any terminal type. If you’ve ever used nano before, everything you see is made using curses. The current version of curses is ncurses (short for new curses), and after seeing some examples of it in action I was super excited to start writing a GUI.
As in my last post, I’m not going to go over the code line-by-line, but I will include some code sketches and images.
curses works by handling all the nitty-gritty of printing to a specific window, and allows the programmer to focus on what they actually want to see displayed. Once a WINDOW object is initialized, printing to it is very similar to normal I/O from C. The basic outline of an interactive GUI looks like this:
#include <ncurses.h>

void interactive_gui(){
  // initialize window
  // If you don't give it a height/width,
  // it defaults to the entire screen
  WINDOW *mem_win;
  bool quit = false;

  // Initialize the screen
  initscr();

  clear();
  noecho();
  cbreak();
  curs_set(0); // turn off cursor

  // create a subwindow within the screen
  mem_win = newwin(0, 0, 0, 0);
  // refresh it once so we can start displaying content
  wrefresh(mem_win);

  // This function prints out whatever we want
  print_page_function();

  // main loop to get user input then react
  while(!quit){
    c = wgetch(mem_win);
    switch(c){
      case 'q':
        quit = true;
        break;
      // Other keycodes can go here
      default:
        break;
    }

    print_page_function();
  }

  // general cleanup
  // calling endwin() is really important
  // because it GC's everything allocated for the window
  // not calling it has messed up my terminal
  clrtoeol();
  refresh();
  endwin();
  return;
}

void print_page_function(){
  // print at a specific coordinate
  mvprintw(0, 0, "Printing stuff from coordinates 0,0!\n");

  // print from wherever the cursor is
  printw("\n\nPress 'q' to quit.");
  printw("\n> ");
  refresh();
  return;
}
Essentially, the only change from regular printf calls is we first create a window and subwindow, then we use printw and mvprintw to print to it. wgetch will wait until a character is received, and then we can switch...case on it to check for certain inputs. curses also implements special macros for certain keycodes, such as KEY_UP or KEY_DOWN for the up/down arrows (respectively). Since wgetch only reads a character at a time, if you want to read in entire strings you’ll need to allocate a character buffer, read to it on character inputs, and then process the whole string at once on KEY_ENTER.
GUIs always end up taking tons of time for me because there’s always some tiny aspect of the display that could be just a little better. At this point, though, I’m pretty happy with what I’ve designed. By the time anyone reads this I’ll probably have changed it again, but for now the final product looks like this (it’s a video, just relatively slow):
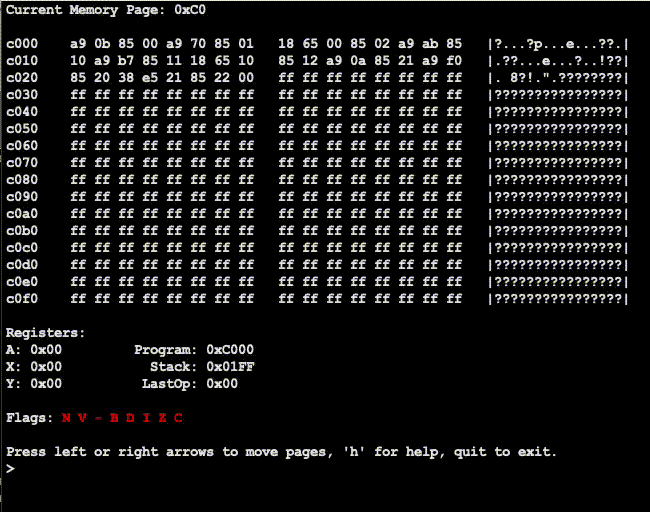
The top section displays the current memory page (0x00-0xFF) as well as a hexdump of the memory contents. Below that, we have all the individual registers, the program counter, stack pointer, and the bytecode of the last operation executed (this is super helpful for debugging). Finally, the flags are displayed using red/green for clear/set on terminals that support color. If color isn’t supported, it instead displays the values of each flag using binary numbers.
User input is shown at the >, and the following commands are supported:
- Moving memory page by one using left/right arrows (ex.
0xA0to0xA1) - Move memory page by
0x10using up/down arrows or scrolling (ex.0x80to0x90) - Moving directly to a memory page by typing it in (ex. type
10to go to0x10) - Jump to whichever page the program counter is on with
home - Executing individual commands by using
steporstep n, the latter executingncommands - Run until a
BRKcommand withrun - Display help using
help - Quit the program using
quit
Overall, I’m really pleased with it! It feels intuitive and easy to use (but to be fair, I’m the one who wrote it). The information is similar to that of Symon, but all within a terminal window.
Bug Testing
Now that I have a GUI, I can finally start writing test suites. There are a lot of opcodes to test, but I’m slowly working through them. I’ve currently written one test suite to test all the addressing modes supported by loads/stores to all the registers, as well as load/store/transfer to all registers that support it. This led to me finding a ton of bugs, which was…expected but still disheartening. Thankfully it wasn’t too hard to fix the issues, and everything I’ve tested should be working properly now. I’ve also implemented tests for ADC and SBC, which are now working. These tests suites are located at loadstore.asm and arithmetic.asm, and were compiled with xa -C -M. Here’s an example of running the loadstore test:
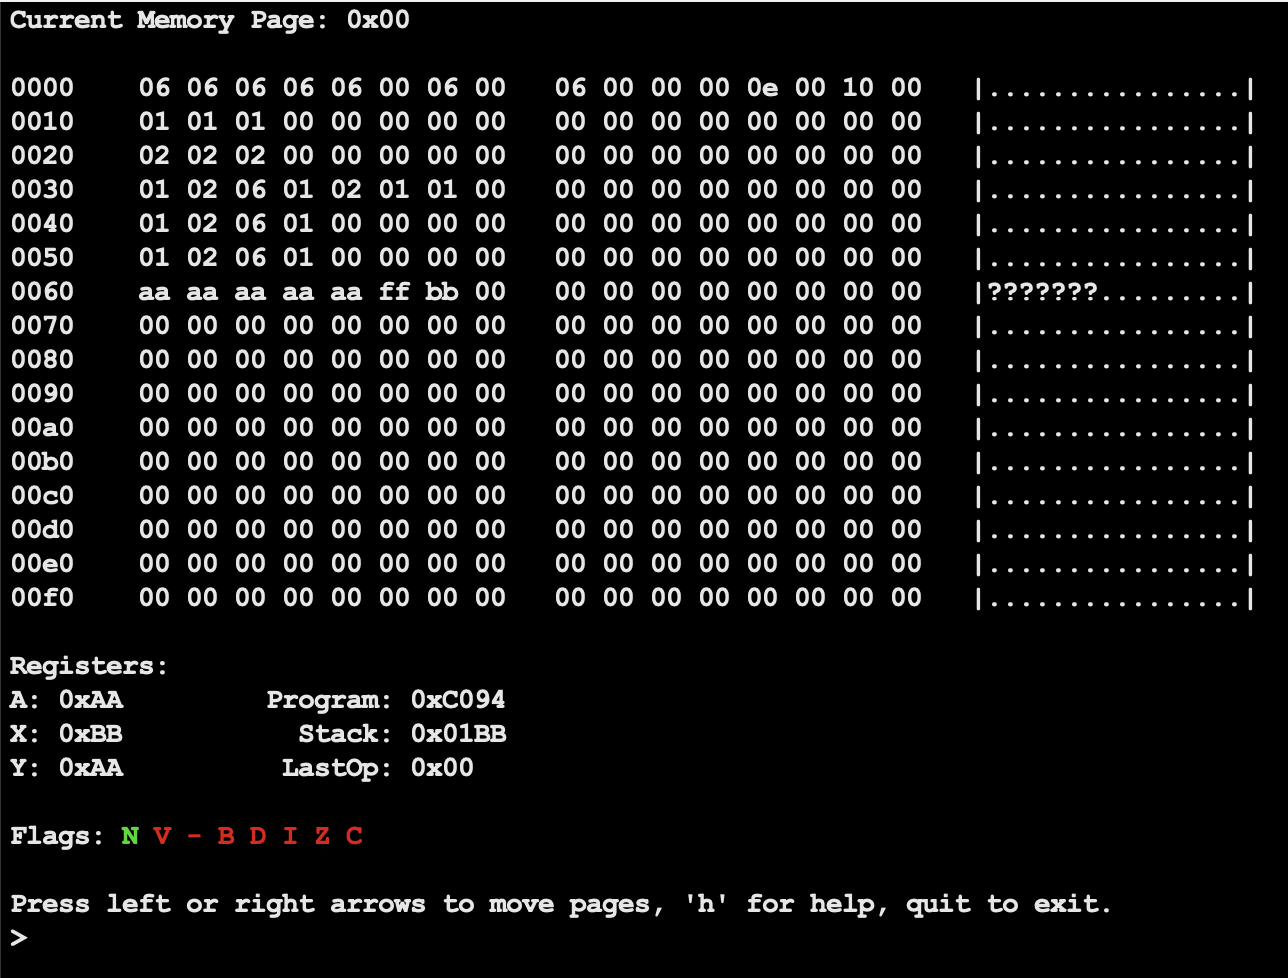
This program loads and stores a bunch of numbers using all the different addressing modes to various locations on the zero page. I think it would probably be possible to write an automated test that runs all the test cases and reports pass/fail without me having to manually check the result, but that will be a project for another day.
Next Steps
If you’ve made it this far, thanks for reading! I hope you learned something, or at least enjoyed the writeup. This emulator is approaching its final stages, I’m really just checking all the opcodes to make sure they’re working properly. I’m not planning to write another full blog post about this project since it’ll be mainly test suites and bugfixes, but I’ll probably put up a short post when I officially finish the project.
As always, you can check out the complete code on Github. Thanks for reading!